
ruoyi-usage.md 20 KB
BearJia Vue3 前端对接 RuoYi 使用指南
前言
从前天发文到现在,一致问的最多的问题是,后端在哪呀,怎么和若依集成使用哇??
在我昨天突然想着更新一集若依集成BearJia-Vue3 的时候,做了一件你们想做又不敢做的事情:删库了
没错就是删库了,所有数据库都重置了,我昨天都懵了,怎么回事,怎么会这样
连夜去根据binlog 恢复数据库,今天这篇就不讲了如何恢复了,下次再讲哈
那么接下来 如何使用 bear-jia-vue3 前端与 RuoYi 后端进行对接,包括环境变量、代理配置、请求封装、权限指令、字典用法等关键点。
项目地址
还有一个就是有没有后端代码,后端代码有的啦,在初次发文的时候就提供了后端代码,同时也都开源了,但是怪我,忘记提交数据库了,但是不要慌,跟若依的脚本一模一样,完全不影响使用的哈,可以直接用若依的脚本,也可以用我后端提供的脚本哈
相关仓库地址
- BearJia 后端地址:https://gitee.com/javaxiaobear_admin/bearjia-admin-backend.git
- BearJia 前端地址:https://gitee.com/javaxiaobear_admin/bear-jia-vue3.git
- RuoYi 官方地址:https://gitee.com/y_project/RuoYi-Vue.git
技术栈对比
| 项目 | 前端技术栈 | 后端技术栈 | UI组件库 |
|---|---|---|---|
| RuoYi | Vue 2.x + Element UI | Spring Boot + MyBatis | Element UI |
| BearJia-vue3 | Vue 3.x + Ant Design Vue | Spring Boot + MyBatis | Ant Design Vue |
快速开始
1. 环境准备
系统要求
- Node.js: 16.x 或更高版本
- npm/yarn/pnpm: 推荐使用 pnpm
- Java: JDK 8 或更高版本
- MySQL: 5.7 或更高版本
- Redis: 6.x 或更高版本(可选)
2. 后端环境搭建
2.1 克隆RuoYi后端项目
# 克隆RuoYi官方项目
git clone https://gitee.com/y_project/RuoYi-Vue.git

# 或者使用BearJia定制版后端
git clone https://gitee.com/javaxiaobear_admin/bearjia-admin-backend.git
2.2 数据库配置
创建数据库
CREATE DATABASE `ry-vue` DEFAULT CHARACTER SET utf8mb4 COLLATE utf8mb4_general_ci;导入数据库脚本
# 进入项目sql目录
cd RuoYi-Vue/sql

# 依次执行以下脚本
mysql -u root -p ry-vue < ry_20210908.sql
mysql -u root -p ry-vue < quartz.sql
修改数据库配置
# application-druid.yml
spring:
datasource:
druid:
  master:
    url: jdbc:mysql://localhost:3306/ry-vue?useUnicode=true&characterEncoding=utf8&zeroDateTimeBehavior=convertToNull&useSSL=true&serverTimezone=GMT%2B8
    username: root
    password: your_password
2.3 启动后端服务
# 进入项目目录
cd RuoYi-Vue

# 使用Maven启动
mvn clean install
mvn spring-boot:run

# 或者使用IDE直接运行 RuoYiApplication.java
启动成功标志:
- 控制台输出:
RuoYi启动成功 - 访问:http://localhost:8080 能看到接口文档
3. 前端环境搭建
3.1 克隆BearJia前端项目
# 克隆BearJia Vue3前端项目
git clone https://gitee.com/javaxiaobear_admin/bear-jia-vue3.git

# 进入项目目录
cd bear-jia-vue3
3.2 安装依赖
# 推荐使用pnpm(速度更快)
pnpm install

# 或者使用npm
npm install

# 或者使用yarn
yarn install
3.3 环境配置
检查 .env.development 文件配置:
# 应用标题
VITE_APP_TITLE=Elderly Care

# 开发环境配置
VITE_APP_ENV=development

# 开发环境接口地址
VITE_APP_BASE_API=/dev-api

# 开发服务器端口
VITE_PORT=5173

# 应用基础路径
VITE_BASE_URL=/
3.4 启动前端服务
# 启动开发服务器
pnpm dev

# 或者
npm run dev
启动成功标志:
- 控制台输出:
Local: http://localhost:5173/ - 浏览器自动打开登录页面
4. 验证前后端联调
4.1 登录测试
- 访问地址:http://localhost:5173
- 默认账号:admin / admin123
- 登录成功:跳转到系统首页
4.2 功能测试
- 系统管理 → 用户管理:能正常显示用户列表
- 系统管理 → 菜单管理:能正常显示菜单树
- 系统工具 → 代码生成:能正常显示数据表列表
核心配置修改
1. 代码生成器配置
为了让RuoYi后端能够生成适配BearJia Vue3前端的代码,需要修改代码生成器的模板配置。
1.1 修改模板列表方法
找到 com.ruoyi.generator.util.VelocityUtils 类中的 getTemplateList 方法:
原始代码:
public static List<String> getTemplateList(String tplCategory, String tplWebType)
    {
        String useWebType = "vm/vue";
        if ("element-plus".equals(tplWebType))
        {
            useWebType = "vm/vue/v3";
        }
        List<String> templates = new ArrayList<String>();
        templates.add("vm/java/domain.java.vm");
        templates.add("vm/java/mapper.java.vm");
        templates.add("vm/java/service.java.vm");
        templates.add("vm/java/serviceImpl.java.vm");
        templates.add("vm/java/controller.java.vm");
        templates.add("vm/xml/mapper.xml.vm");
        templates.add("vm/sql/sql.vm");
        templates.add("vm/js/api.js.vm");
        if (GenConstants.TPL_CRUD.equals(tplCategory))
        {
            templates.add(useWebType + "/index.vue.vm");
        }
        else if (GenConstants.TPL_TREE.equals(tplCategory))
        {
            templates.add(useWebType + "/index-tree.vue.vm");
        }
        else if (GenConstants.TPL_SUB.equals(tplCategory))
        {
            templates.add(useWebType + "/index.vue.vm");
            templates.add("vm/java/sub-domain.java.vm");
        }
        return templates;
    }
修改后的代码:
  public static List<String> getTemplateList(String tplCategory, String tplWebType)
    {
        String useWebType = "vm/bearjia";
//        if ("element-plus".equals(tplWebType))
//        {
//            useWebType = "vm/vue/v3";
//        }
        List<String> templates = new ArrayList<String>();
        templates.add("vm/java/domain.java.vm");
        templates.add("vm/java/mapper.java.vm");
        templates.add("vm/java/service.java.vm");
        templates.add("vm/java/serviceImpl.java.vm");
        templates.add("vm/java/controller.java.vm");
        templates.add("vm/xml/mapper.xml.vm");
        templates.add("vm/sql/sql.vm");
        templates.add("vm/js/api.js.vm");
        if (GenConstants.TPL_CRUD.equals(tplCategory))
        {
            templates.add(useWebType + "/index.vue.vm");
            templates.add(useWebType + "/detailModal.vue.vm");
            templates.add(useWebType + "/addUpdateModal.vue.vm");
        }
        else if (GenConstants.TPL_TREE.equals(tplCategory))
        {
            templates.add(useWebType + "/index-tree.vue.vm");
        }
        else if (GenConstants.TPL_SUB.equals(tplCategory))
        {
            templates.add(useWebType + "/index.vue.vm");
            templates.add("vm/java/sub-domain.java.vm");
        }
        return templates;
    }
1.2 修改文件名生成方法
同样在 VelocityUtils 类中,找到 getFileName 方法并进行修改:
public static String getFileName(String template, GenTable genTable)
    {
        // 文件名称
        String fileName = "";
        // 包路径
        String packageName = genTable.getPackageName();
        // 模块名
        String moduleName = genTable.getModuleName();
        // 大写类名
        String className = genTable.getClassName();
        // 业务名称
        String businessName = genTable.getBusinessName();

        String javaPath = PROJECT_PATH + "/" + StringUtils.replace(packageName, ".", "/");
        String mybatisPath = MYBATIS_PATH + "/" + moduleName;
        String vuePath = "vue";

        if (template.contains("domain.java.vm"))
        {
            fileName = StringUtils.format("{}/domain/{}.java", javaPath, className);
        }
        if (template.contains("sub-domain.java.vm") && StringUtils.equals(GenConstants.TPL_SUB, genTable.getTplCategory()))
        {
            fileName = StringUtils.format("{}/domain/{}.java", javaPath, genTable.getSubTable().getClassName());
        }
        else if (template.contains("mapper.java.vm"))
        {
            fileName = StringUtils.format("{}/mapper/{}Mapper.java", javaPath, className);
        }
        else if (template.contains("service.java.vm"))
        {
            fileName = StringUtils.format("{}/service/I{}Service.java", javaPath, className);
        }
        else if (template.contains("serviceImpl.java.vm"))
        {
            fileName = StringUtils.format("{}/service/impl/{}ServiceImpl.java", javaPath, className);
        }
        else if (template.contains("controller.java.vm"))
        {
            fileName = StringUtils.format("{}/controller/{}Controller.java", javaPath, className);
        }
        else if (template.contains("mapper.xml.vm"))
        {
            fileName = StringUtils.format("{}/{}Mapper.xml", mybatisPath, className);
        }
        else if (template.contains("sql.vm"))
        {
            fileName = businessName + "Menu.sql";
        }
        else if (template.contains("api.js.vm"))
        {
            fileName = StringUtils.format("{}/api/{}/{}.js", vuePath, moduleName, businessName);
        }
        else if (template.contains("index.vue.vm"))
        {
            fileName = StringUtils.format("{}/views/{}/{}/index.vue", vuePath, moduleName, businessName);
        }
        else if (template.contains("detailModal.vue.vm"))
        {
            fileName = StringUtils.format("{}/views/{}/{}/detailModal.vue", vuePath, moduleName, businessName);
        }
        else if (template.contains("addUpdateModal.vue.vm"))
        {
            fileName = StringUtils.format("{}/views/{}/{}/addUpdateModal.vue", vuePath, moduleName, businessName);
        }
        else if (template.contains("index-tree.vue.vm"))
        {
            fileName = StringUtils.format("{}/views/{}/{}/index.vue", vuePath, moduleName, businessName);
        }
        return fileName;
    }
1.3 添加BearJia模板文件
复制BearJia-Vue3下的docs下面的模板代码
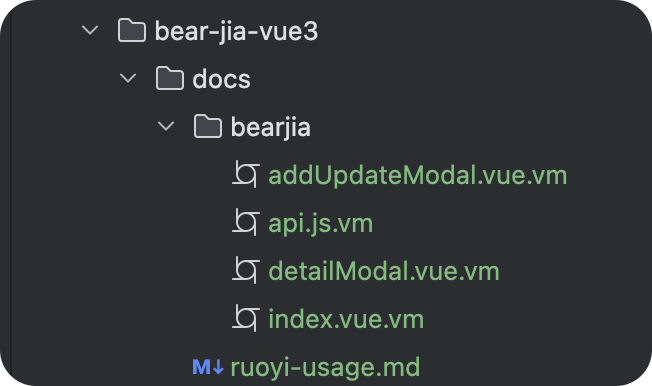
在 ruoyi-generator/src/main/resources/vm/ 目录下创建 bearjia 文件夹,并添加以下模板文件:
vm/bearjia/
├── index.vue.vm           # 主页面模板
├── addUpdateModal.vue.vm  # 新增/编辑弹窗模板
└── detailModal.vue.vm     # 详情查看弹窗模板
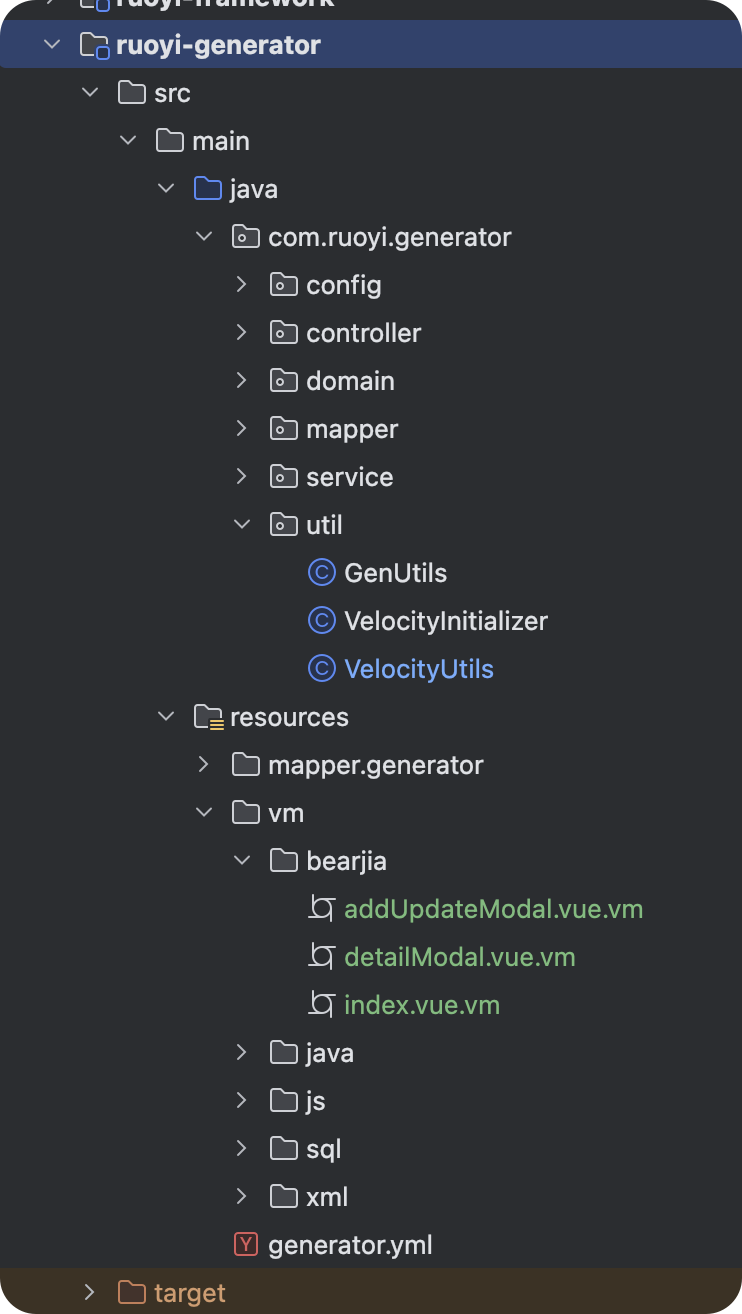
模板文件说明:
- index.vue.vm: 主列表页面,包含表格、搜索、操作按钮等
- addUpdateModal.vue.vm: 新增和编辑的弹窗组件
- detailModal.vue.vm: 查看详情的弹窗组件
1.4 配置完成验证
完成以上配置后,重启RuoYi后端服务,进入代码生成页面:
- 访问代码生成:系统工具 → 代码生成
- 选择数据表:点击"导入"按钮导入数据库表
- 生成代码:选择表后点击"生成代码"
- 下载代码包:会生成包含BearJia Vue3组件的完整代码
以上就可以完美结合若依的后端代码了运行啦!!!
生成的页面效果
2. 代码生成的模板效果
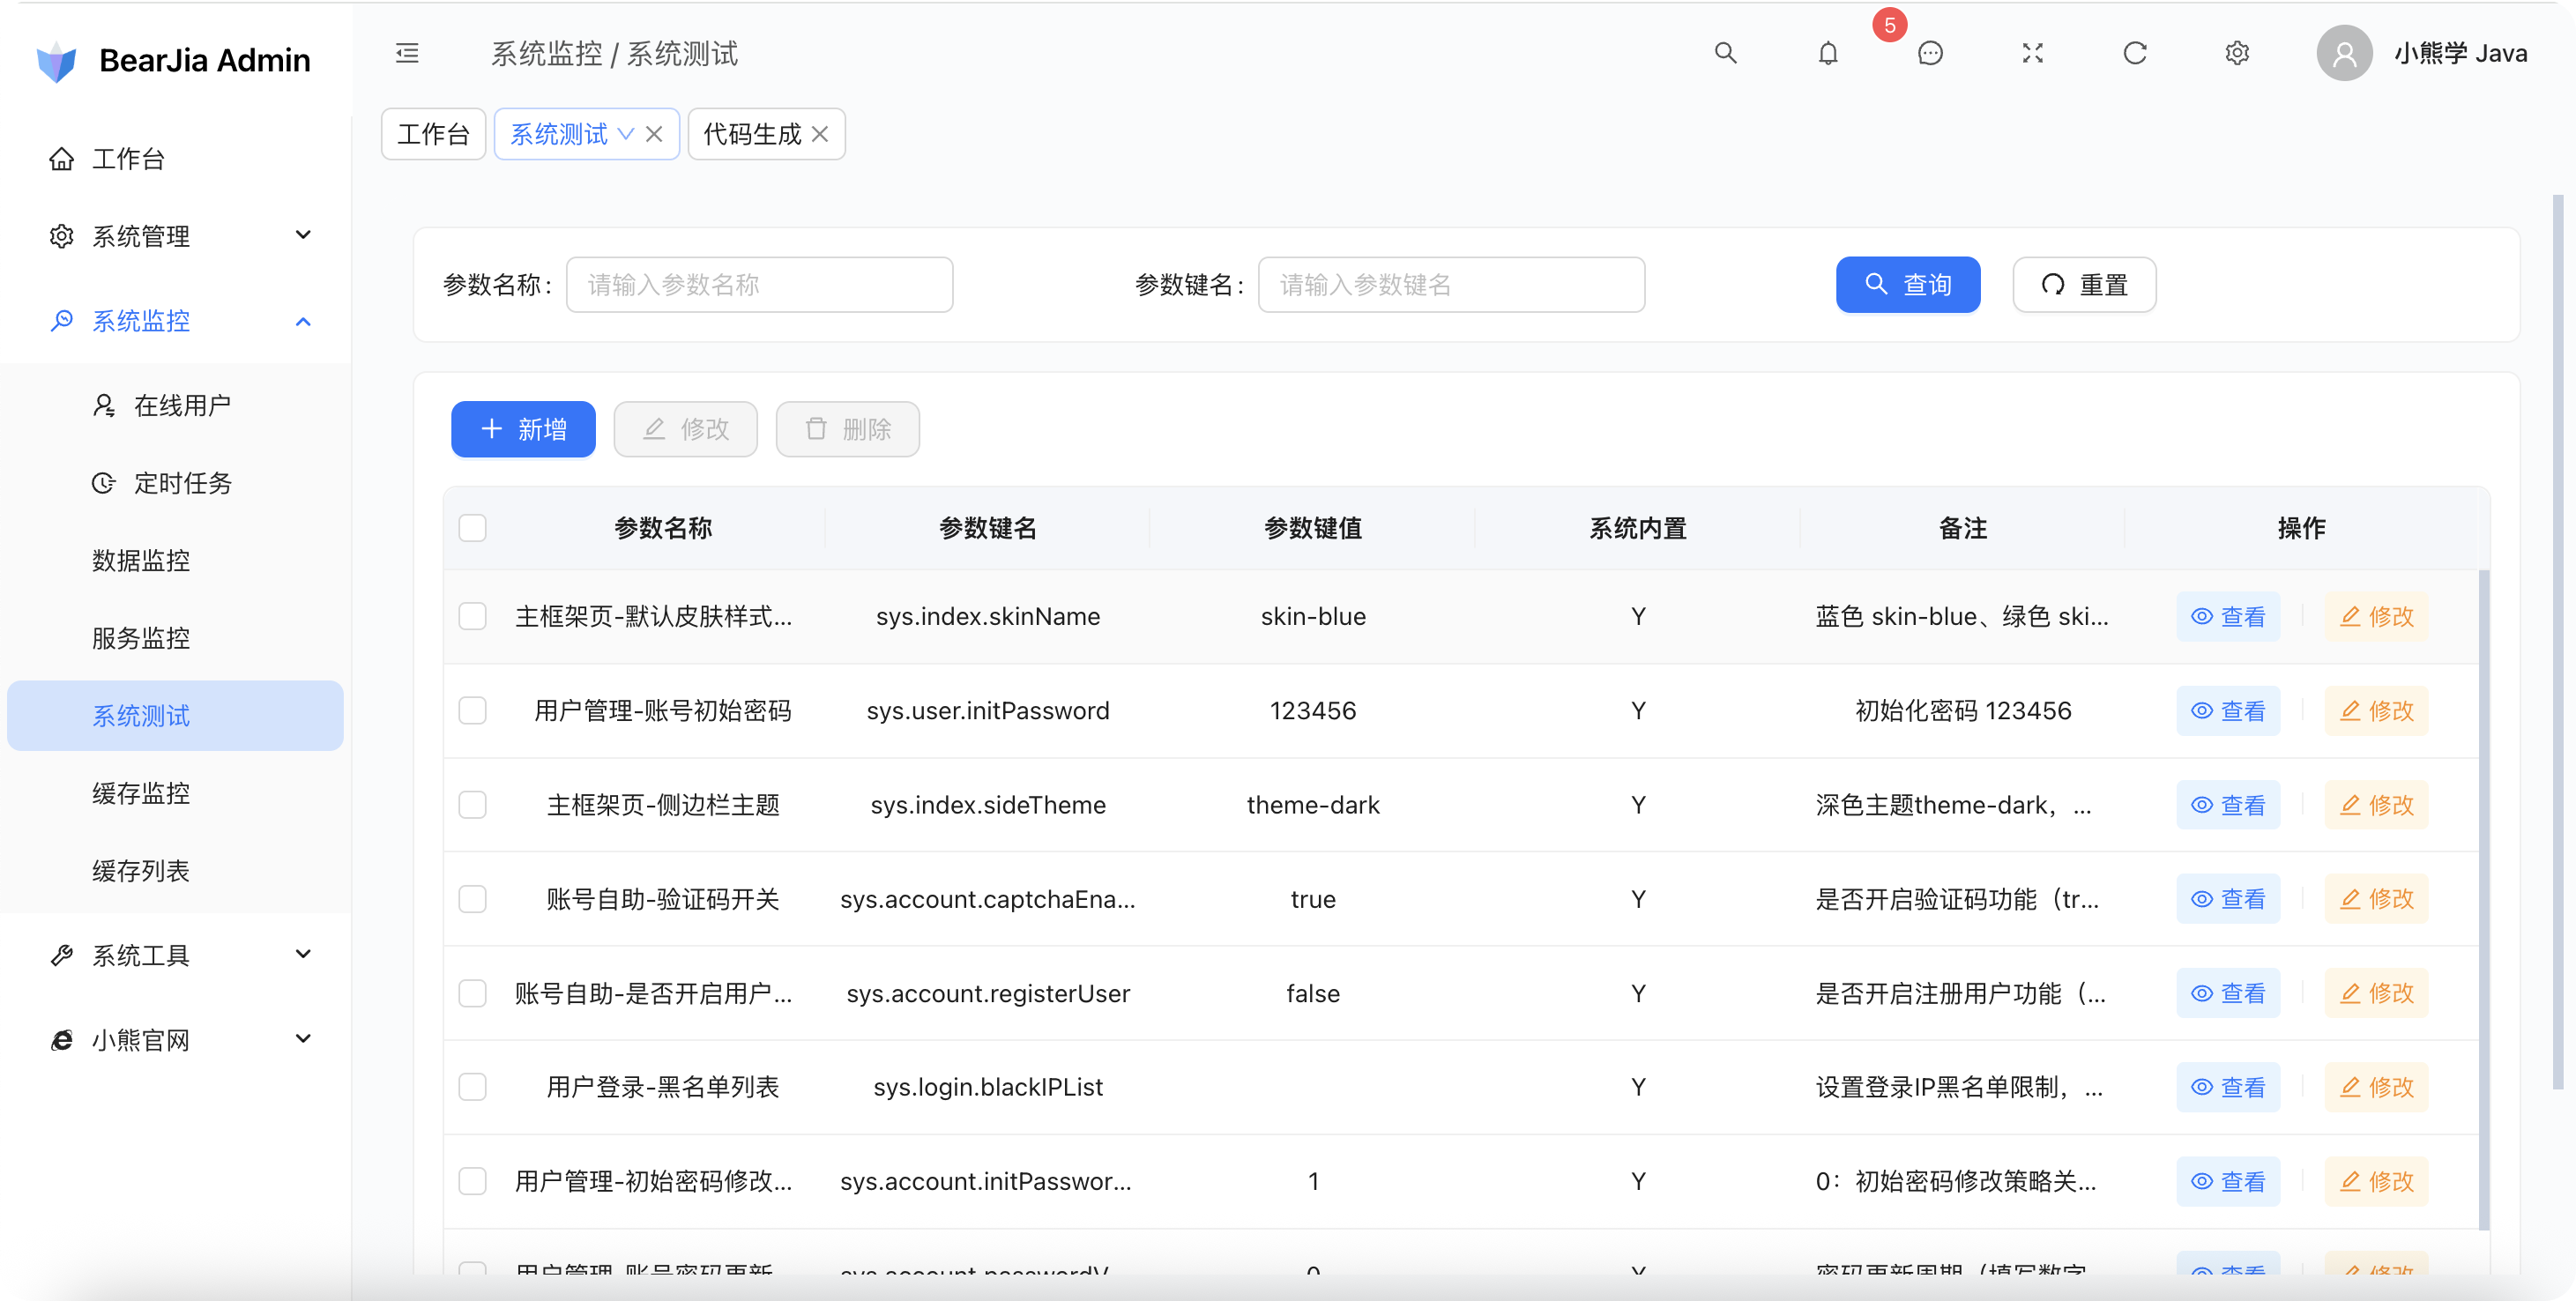
现在一个页面很简洁的代码,就可以生成一个有点小颜值的页面了
页面特点:
- 🎨 现代化UI:基于Ant Design Vue的精美界面
- 🔍 智能搜索:支持多字段组合搜索
- 📊 数据表格:支持排序、分页、导出等功能
- ⚡ 快速操作:新增、编辑、删除、查看等操作
- 📱 响应式设计:适配不同屏幕尺寸
 <template>
  <div class="app-container">
    <ProTable
      ref="proTableRef"
      :api="tableApi"
      :columns="columns"
      :searchFields="searchFields"
      :initialSearchParams="initialSearchParams"
      :exportConfig="exportConfig"
      rowKey="configId"
    >
      <!-- 自定义操作按钮 -->
      <template #actions="{ selectedRowKeys, selectedRows }">
        <a-button type="primary" @click="handleAdd" v-hasPermi="['system:config:add']">
          <BearJiaIcon icon="plus-outlined" />
          新增
        </a-button>
        <a-button
          type="primary"
          :disabled="selectedRowKeys.length !== 1"
          @click="handleEdit(selectedRows[0])"
          v-hasPermi="['system:config:edit']"
        >
          <BearJiaIcon icon="edit-outlined" />
          修改
        </a-button>
        <a-button
          type="primary"
          danger
          :disabled="selectedRowKeys.length === 0"
          @click="handleDelete(selectedRowKeys)"
          v-hasPermi="['system:config:remove']"
        >
          <BearJiaIcon icon="delete-outlined" />
          删除
        </a-button>
      </template>

      <!-- 自定义列渲染 -->
      <template #bodyCell="{ column, record }">
        <!-- 操作列 -->
        <template v-if="column.dataIndex === 'action'">
          <TableActionBar
              :hasDelete="false"
              :hasEdit="true"
              :hasView="true"
              :record="record"
              @edit="handleEdit"
              @view="handleView"/>
        </template>
      </template>
    </ProTable>

    <!-- 新增/编辑弹窗 -->
    <AddUpdateModal
      ref="addUpdateModalRef"
      @success="refreshTable"
    />

    <!-- 详情弹窗 -->
    <DetailModal ref="detailModalRef" />
  </div>
</template>

<script setup>
import { getCurrentInstance, ref, computed } from 'vue';
import { message } from 'ant-design-vue';
import ProTable from '@/components/BearJiaProTable/index.vue';
import TableActionBar from '@/components/TableActionBar/index.vue';
import { BearJiaIcon } from '@/utils/BearJiaIcon.js';
import BearJiaUtil from '@/utils/BearJiaUtil.js';

import AddUpdateModal from './addUpdateModal.vue';
import DetailModal from './detailModal.vue';
import { listConfig, delConfig } from '@/api/system/config';

// 获取当前实例
const { proxy } = getCurrentInstance();

// 字典数据

// 组件引用
const proTableRef = ref();
const addUpdateModalRef = ref();
const detailModalRef = ref();


// 表格API配置
const tableApi = {
  list: listConfig,
  delete: delConfig,
};

// 初始搜索参数
const initialSearchParams = {
  configName: null,
  configKey: null,
  configValue: null,
  configType: null,
};

// 导出配置
const exportConfig = {
  url: 'system/config/export',
  fileName: '参数配置数据'
};

// 搜索字段配置
const searchFields = computed(() => [
  {name: 'configName', label: '参数名称', type: 'input'},
  {name: 'configKey', label: '参数键名', type: 'input'},
]);

// 表格列配置
const columns = [
  {
    title: '参数名称',
    dataIndex: 'configName',
    key: 'configName',
    align: 'center',
    ellipsis: true
  },
  {
    title: '参数键名',
    dataIndex: 'configKey',
    key: 'configKey',
    align: 'center',
    ellipsis: true
  },
  {
    title: '参数键值',
    dataIndex: 'configValue',
    key: 'configValue',
    align: 'center',
    ellipsis: true
  },
  {
    title: '系统内置',
    dataIndex: 'configType',
    key: 'configType',
    align: 'center',
    ellipsis: true
  },
  {
    title: '备注',
    dataIndex: 'remark',
    key: 'remark',
    align: 'center',
    ellipsis: true
  },
  {
    title: '操作',
    dataIndex: 'action',
    key: 'action',
    width: 200,
    align: 'center',
    fixed: 'right'
  }
];

// 新增
const handleAdd = () => {
  addUpdateModalRef.value.open('add');
};

// 编辑
const handleEdit = (record) => {
  addUpdateModalRef.value.open('edit', record);
};


// 查看详情
const handleView = (record) => {
  detailModalRef.value.open(record);
};

// 删除
const handleDelete = async (ids) => {
  try {
    await delConfig(ids.join(','));
    message.success('删除成功');
    refreshTable();
  } catch (error) {
    console.error('删除失败:', error);
  }
};

// 刷新表格
const refreshTable = () => {
  proTableRef.value.reload();
};

</script>

<style lang="less" scoped>
.app-container {
  padding: 16px;
}
</style>
高级功能
3. 组件库集成
3.1 ProTable 高级表格组件
封装的高级表格组件,支持搜索、分页、导出等功能:
<!-- 使用示例 -->
<template>
  <ProTable
    ref="proTableRef"
    :columns="columns"
    :api="tableApi"
    :search-fields="searchFields"
  >
    <template #actions="{ selectedRowKeys }">
      <a-button type="primary" @click="handleAdd">新增</a-button>
      <a-button :disabled="!selectedRowKeys.length" @click="handleBatchDelete">
        批量删除
      </a-button>
    </template>
  </ProTable>
</template>
4. 部署与优化
4.1 生产环境部署
Nginx 配置示例:
server {
    listen 80;
    server_name your-domain.com;
    root /var/www/bear-jia-vue3/dist;

    location / {
        try_files $uri $uri/ /index.html;
    }

    location /prod-api/ {
        proxy_pass http://localhost:8080/;
        proxy_set_header Host $host;
    }
}
连夜更新
没有想到的是,这个 UI 框架出来这么大的反响,有好的也有坏的,我一开始也是想着先发布吧,没有完美的作品,一代一代的优化完善打磨出来,问的最多的也是如何兼容若依的使用?
详细问题答疑
Q1: 对应的后端有没?
A: 有的!BearJia提供了完整的后端代码:
- BearJia后端:https://gitee.com/javaxiaobear_admin/bearjia-admin-backend.git
- RuoYi官方:https://gitee.com/y_project/RuoYi-Vue.git
- 两者完全兼容,可以任选其一
Q2: 后端接口有配套吗?
A: 完全配套!所有接口都与RuoYi保持一致:
- 登录认证接口:
/login、/getInfo、/logout - 系统管理接口:用户、角色、菜单、字典等
- 代码生成接口:表导入、代码生成、预览等
- 完整的CRUD操作接口
Q3: 若依的后台咋配?
A: 按照本文档步骤即可:
- 克隆项目:
git clone https://gitee.com/y_project/RuoYi-Vue.git - 导入数据库:执行sql目录下的脚本
- 修改配置:数据库连接、Redis配置等
- 修改代码生成器:替换模板配置方法
- 启动服务:
mvn spring-boot:run
Q4: AI 味十足?
A: 哈哈,确实融入了AI!
- 🤖 智能代码生成:一键生成Vue3组件
- 🎨 现代化UI:基于Ant Design Vue 4.x
- ⚡ 响应式设计:适配各种屏幕尺寸
- 🔧 组合式API:更好的代码组织和复用
- 但核心还是实用性优先,追求开发效率!
快速上手建议
新手推荐:
- 先熟悉RuoYi官方文档
- 按本文档步骤配置环境
- 从简单的CRUD页面开始
进阶开发:
- 学习Vue3组合式API
- 掌握Ant Design Vue组件
- 自定义业务组件
生产部署:
- 配置Nginx反向代理
- 优化构建配置
- 监控和日志配置
🔗 相关资源
最后,感谢大家的关注和反馈! 🙏
BearJia Vue3 会持续优化完善,打造更好的开发体验。有问题欢迎提Issues,一起让这个项目变得更好!